Model of Pulley System for my Shooting Range
Notes
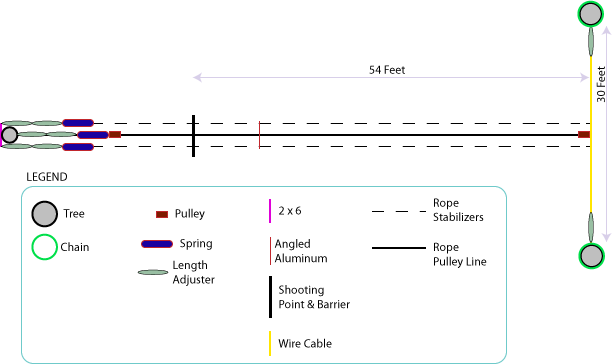
- I put a chain around each of two trees that were about 30 feet apart. I fastened them to the trees with fence post nails. This allows the targets to be in the middle with no tree directly behind them. If I had just used one tree, I'd be constantly shooting into its trunk.
- A wire cable is connected to each of these chains. I used oval steel quick links or something similar for many of the connections, including this connection between the wire cable and the chains.
- Actually, I put length-adjusters between the wire cable and the chains on either end to be able to adjust the tightness of the cable once it's up. I didn't adjust the length to be as tight as possible. The pulley rope is designed to pull it out and thus make it tighter. This allows for some slack in the cable in case of high winds (see below on "springs.")
- I attached two stabilizing ropes to a wooden assembly I made to slide on the wire cable. Between these two ropes and in the center I attached a pulley with a rope in it. (You could also use plastic-covered wire instead of ropes but it's more expensive.) To make this apparatus slidable on the cable wire, I used two pieces of 4x1/2 oak and bolted them together with the wire cable in the middle. (I also put several coats of polyurethane on the oak pieces.) I had first routed out a groove on one of the pieces of oak for the wire cable to slide through. So the two stabilizing ropes and the pulley-with-rope were attached to the outer oak piece. If you don't want these things slidable you could just use the oval steel quick links or something similar. But if anything every goes wrong in the middle, you would have to take everything down to fix it. Since it's slidable, you can (with the attached rope that hangs down), pull the center oak piece to one side and reach it by climbing a ladder placed against the tree.
- On the other (shooter's) end of the pulley system I put up a 2x6 (covered with polyurethane) on the outside of a tree that was about 75 feet away from the wire cable. The two stabilizing ropes are attached to each end of the 2x6. (Indirectly. See below)
- The idea is that the pulley on this shooter's end of the center rope is attached to the tree, and thus is in the center between the two stabilizing ropes.
- Between the stabilizing ropes and the 2x6 I placed two large length-adjusters and a spring. The spring is quite stiff, and I put it there to protect the line from breaking in high winds. This also tightens the wire cable at the other (target) end and allows it to flex in high winds.
- Between the pulley and the tree I also placed two length-adjusters and a stiff spring.
- I fastened each end of the pulley rope to the center of an angled (90 degree angle to keep it from bending) aluminum bar.
- I drilled a hole in each end of the aluminum bar and ran the stabilizing ropes through them.
- The tension of the ropes needs to be adjusted (thus the need for the length-adjusters on the three ropes) so the aluminum bar runs smoothly and without dragging on either of the ends.
- The Shooting Point & Barrier is 54 feet from the wire cable at the end.